When I first spotted the amazing elephant bust for sale at Anthropologie I knew immediately I wanted one for Asher's room.
I then looked at the price... Though this elephant was amazing, there were some things I did not like about it; its major fault was the price but I thought it looked a little mean. So of course I thought to myself, "I will make one!" With the amazing motivation of a friend and our combined lack of experience with decoupage we bravely took on the daunting task or making our own elephant busts. Below is a short/rushed tutorial of our elephant journey (I am posting this tutorial for a friend at 39 weeks pregnant and even thinking about doing it again might send me into labor, yay! Hence, the unedited photos).
WARNING -----> This "craft" is not for the weak of heart. It is tetious, a pit painful and at times feels as if it will never end. With that said, I am extremely happy with the outcome and do not regret making one for my little guy. I also really LOVED being able to spend this time with the amazing Katie. <------- WARNING
What you will need:
A large sheet of cardboard (we were lucky enough to have our fridge break so we had a
refrigerator box on hand, If you are not this
blessed I am sure you can just tape some together.
Masking tape
Some sort of newspaper or packing paper (we used packing paper)
Wire hanger
Decoupage
Map, book pages or whatever you choose to cover your elephant with
Step 1: Find your inspiration.
I looked at a ton of photos online of elephants online and
figured out what I liked and did not like. I thought most of them looked a bit
to mean and wanted to make a nice one for my son’s room. You can find a few
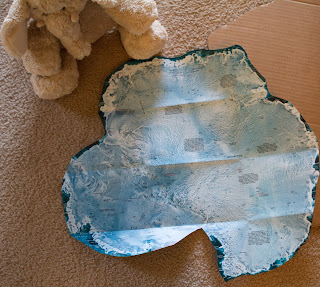
examples on pinterest. Our inspiration mostly came from a map or Antarctica
(shape of elephant ear) and my son’s stuffed animal. We made a joint decision
to leave off the tusks.
Step two: Cut out your base (Shape of head and ears). (Once
again we traced a map of Antarctica for both ears)
Step three: Cut out the trunk and top of head. It was better
for us to cut the trunk long the trim down as needed. (Sorry
no photo)
Step 4: Tape the trunk to the base, creating a little hump
at the top of the head for dimension and add paper for extra support.
Step 5: Add more paper to the top of the head and sides and begin to shape (this can be tedious and frustrating)
Step 6: Continue to add paper and form into the shape you
want. Add paper to the top of the ears to add a ridge (cartridge). Cut a slit on the inner ear and bend bottom to ears to about the shape you want them (don't forget to have some trader joes sea salt brownies or a treat of your choice while doing this).
Step 7: Complete ears, face and jaw. Cut trunk to size you
want (remember you are adding paper around it so you might want to cut it a bit
smaller) and add hanger for support (I really stuffed the end of the hanger
into the head, it felt mean but it was necessary)
Step 8: Start forming the trunk.
(Add lots and lots of tape)
(For extra motivation show the elephant to the recipient and see that he is excited)
Step 9: Add lots and lots of tap. Push, punch and squish
until you have accomplished the shape you want... or close enough...
Step 10: I do not have a photo of this but I added an extra small piece of cardboard to the end of the trunk to form the bottom side...
Step 11: Start to decoupage the ears and face with your
choice of medium (we chose maps and book pages). We just brushed the decoupage
on with a foam brush on both sides of paper and smoothed. Smaller pieces are better for the trunk and jaw. We also added some on the back of ears so it looked more complete.


.jpg)
.jpg)
.jpg)
.jpg)
.jpg)
.jpg)
.jpg)
.jpg)
.jpg)
.jpg)
.jpg)
.jpg)
.jpg)
.jpg)

